Home About The Fame! Contact
Showing posts with label birthday. Show all posts

Friday, 29 January 2010

Red Velvet Cupcakes

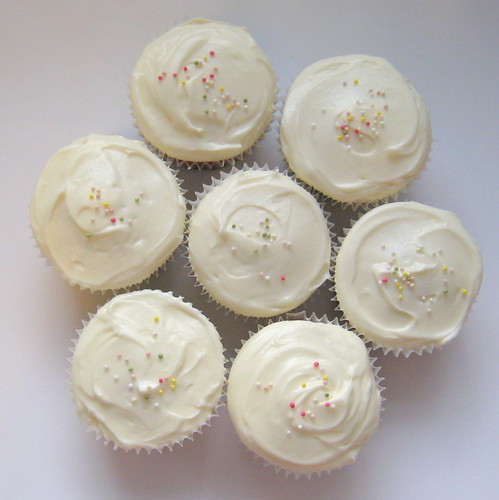
You'd be smiling too, if you were that close to a red velvet cupcake.


It may seem that I've come over all Valentine's and lovey-dovey, so I would just like to clarify up front that this is not the case. These are not Valentine's Day cupcakes, and nor will they be. Though you could make them for that, if you wanted. Or for any number of occasions. Voluntary Redundancy cupcakes perhaps?

No, these are belated birthday cupcakes. Lucy had her birthday last week, and you can't have a birthday without cake. It's the law.

Lucy likes red velvet. I know that sounds like the title of some smutty film, but it's true: she told me so. And if you can't have a bit of what you like on your (albeit belated) birthday, then when can you?

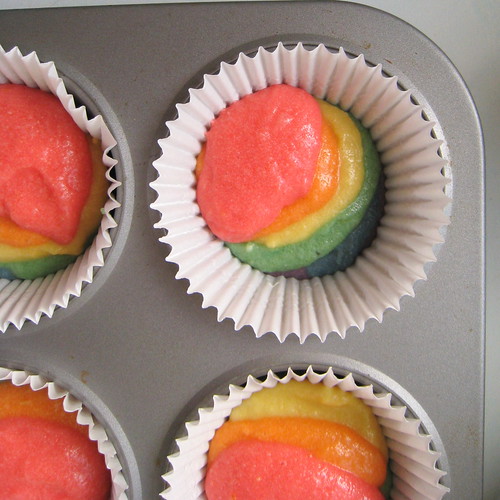
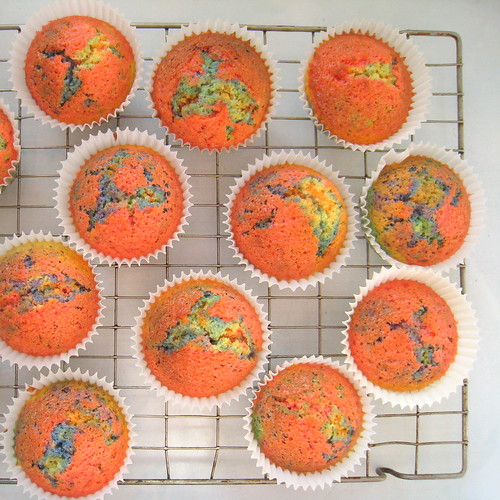
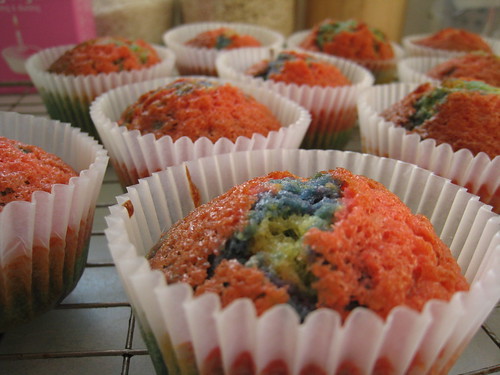
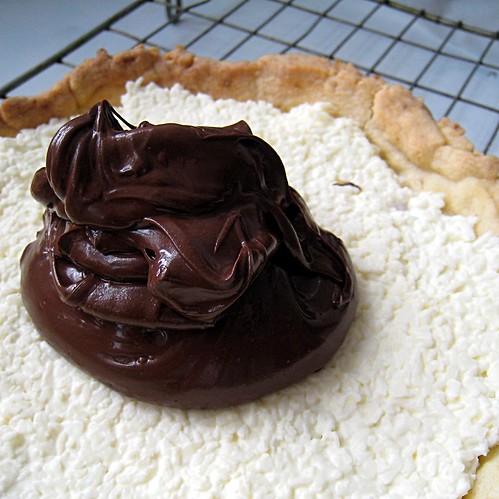
I stopped myself taking too many photos of
these - nobody wants to eat cupcakes that
have been messed about with!

I was going to make the recipe from The Hummingbird Bakery Cookbook, which Mr. Other P would have approved of - he loves red velvet too - but have been noticing a new name cropping up all over the Internet recently that seems to be synonymous with red velvet cake: Rose Levy Beranbaum.

I don't think you can help wanting to bake the cake recipe of someone with a name like that. And more to the point, my inner baker was desperate to give it a go based purely on the method, which is unusual, or seemed so to me.

I lifted the recipe from a website, but am so impressed with the results, and accuracy of the instructions - do what Rose tells you to and follow the times given, and there's no way you could mess this up, even if you'd never baked anything in your life other than potatoes - that I've ordered the book this recipe came from, Rose's Heavenly Cakes. Consider this my recommendation. I had to make a few ingredient substitutions though so this recipe is my amended one.

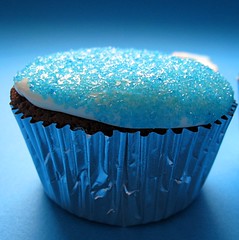
A final word, which you can ignore altogether if you want, but I suggest you don't. Go easy on the sprinkles and decorations. The beauty of red velvet is in the contrast between vibrant, crimson-red cake, and gleaming, fresh, white icing. Anything more than a light dusting of red harlequin sugar or hundreds and thousands, and your cupcakes will become little more than the edible personification of that friend you have who always has bad hair, and you never quite have the heart to be honest with. People will tell you they look beautiful, but they won't really mean it.

Do you want that for your cupcakes?


Red Velvet Cupcakes

You will need:

3 large egg whites
1/2 tsp red food coloring paste (or one whole bottle of liquid colouring)
seeds scraped from one vanilla pod (or 2 tsp vanilla essence, which I didn't have)
175g plain flour
25g cornflour
200g caster sugar
3 tsp baking powder
1 tsp cocoa
60ml vegetable oil
55g unsalted butter, at room temperature
125ml plain natural yogurt (or 125ml buttermilk)

100g cream cheese
30g butter
400g icing sugar, sifted

red harlequin sugar or hundreds and thousands
  1. Preheat the oven to 180°C. Line a 12 bun cupcake tin with paper wrappers (you will actually get 15 cupcakes from this mixture, so may need to bake twice).
  2. In a mixing bowl, lightly mix together the egg whites, vanilla seeds (or essence) and red colouring. You will be amazed and/or horrified at the colour.
  3. Sift the flour, cornflour, sugar, cocoa and baking powder into another bowl. I know that most recipes would say to cream the sugar with the butter, not sift it with the flour, but trust Rose. She knows. (That's what we used to say about my Japanese grammar teacher too - people called Rose are obviously very knowledgeable and trustworthy)
  4. Using an electric hand mixer, in a large bowl, beat the butter and oil together for one minute on medium speed.
  5. Add the dry ingredients and yogurt to the butter mixture, and mix together on low speed. Then, when combined, switch to high speed and mix for one and a half minutes. You should scrape down the sides of the bowl to make sure everything is incorporated.
  6. Add half of the bloodied egg whites. Mix on medium speed for thirty seconds, and then add the rest of the egg mixture. Mix on medium speed for another thirty seconds.
  7. Transfer the batter to the line cupcakes tins, filling each about three quarters full. Bake for twenty minutes until a toothpick inserted into the centre of the cupcakes comes out clean.
  8. Cool on a wire rack.
  9. Make the icing: mix the softened butter with the cream cheese, then add the sugar. You might not need it all - stop at the consistency you like. I like it thick and shiny, so add it all.
  10. Use the icing to frost the cakes - a palate knife makes pretty swirls.
  11. Sprinkle cautiously, and share.

Monday, 11 January 2010

Rainbow Cupcakes

These cupcakes may look normal, but they are hiding a pretty exciting secret.


I don't know if you have ever seen 'The Rocky Horror Picture Show', but I do know that if you haven't, you really need to - when I was younger, it was one of my favourite films (which may explain a thing or two, come to think of it).

I loved the craziness of it all, the bizarre characters and the glittering costumes. And most of all, I loved (and still adore) the music. Richard O'Brien really is a lyrical genius! My favourite part (save the scene at the dinner table, where Brad, Janet et al realise that they've been eating Eddie for dinner) was always where Frank N. Furter brings Rocky to life in the lab. I used to LOVE the way the fluid in the tank containing Rocky turned all the colours of the rainbow as the crazy, high-heeled and fully made-up doctor added various chemicals, creating the 'secret of life itself'. Looking at it now, it's hardly the most exciting of special effects, but it's still quite something to watch.

But what does all of this have to do with cupcakes? Well, not a lot. Not if you're talking about regular cupcakes. But that is not what these are. No sir, these are RAINBOW CUPCAKES!


You still might be thinking this has nothing to do with Rocky Horror,
but hopefully the photo shows where I'm going with this: the graduated rainbow
colours you can make out through the cupcake
wrapper are just like the colours in Frank N. Furter's tank, no?

I made these for Katy (she of azuki bean stew fame). She has a December birthday, which I always equate to being a bit rubbish. My step-brother has one too, and I have seen what happens time and again: birthday presents wrapped in Christmas paper (inexcusable!), joint Christmas/Birthday presents (lame!) and even joint parties. Hardly the way to make the birthday boy/girl feel special.

Anyway, I wanted to take some cakes to her party, and figured that rainbows were pretty far from what most people think of as Christmassy. Plus, like me, Katy's a child of the eighties, so there's always the Rainbow Brite connection for those who wish to make it. They were simple to do - just regular cake mixture, split six ways and dyed accordingly - and a fun way to spend an hour on a cold, dark afternoon.

Incidentally, I know that it's now January. I just forgot about the fact that I'd made these until now. Probably something to do with holiday hustle and bustle (and my sieve-like memory).

Whatever. I should say two things:

  • I stole the idea, shamelessly, from Aleta Meadowlark. But since I worship at the Alter of Omnomicon.com at least twice weekly, I know she won't mind. Plus, her rainbow cake is a layer cake - I have never seen cupcakes made like this before. Which brings me to point number two:
  • Apart from Lucy and Rich's wedding cakes, nothing I have baked has ever caused so many people to tell me I am amazing. I'm not pointing this out to big myself up - I'm just letting you know that you'll rock whatever party you're going to if you take along a dozen of these little twinklies. This is a fact.
Let's just have a quick run-through of the RAINBOW CUPCAKE making process, shall we?


First, you tint the cake batter in rainbow colours. We're lumping indigo and violet
together here - I didn't fancy mixing different shades of purple. (Yes, those are rice bowls)


Then you layer the batter into the cupcake liners...


And bake for 20 minutes, before cooling on a wire rack.


The surfaces look like craters on some far away rainbow planet! To me at least.


The Anatomy of a Rainbow Cupcake


I made them lemon flavour. This is not just because lemon is officially the best flavour cake can ever be, but also because the icing is cream cheese and I think the tastes marry quite nicely. You can make them whatever flavour you like though. People are more likely to notice the colours than the flavour anyway. Unless you think of a flavour to match each colour and add it to the coloured mixtures accordingly. I did want to do that, but it seemed like too much work. I concede though, that a six-flavour cupcake really would be a party in the mouth.

RAINBOW CUPCAKES

You will need:

175g butter
175g granulated sugar
175g plain flour, sifted
3 eggs
1 tsp baking powder
1/2 tsp bicarbonate of soda
1 lemon, juiced and zested
food colouring in red, orange, yellow, green, blue and purple

100g cream cheese
30g butter
400g icing sugar, sifted

hundreds and thousands to decorate

  1. Make the cake mixture following whatever method you normally use. I recommend, as always, the all-in-one; place the eggs, sugar, butter and flour (all at room temperature) in a large bowl, along with the baking powder and bicarb., and mix using an electric hand whisk until combined. Add the lemon juice and zest, and mix again.
  2. Divide this mixture equally into 6 bowls and tint each a different colour of the rainbow.
  3. Line a 12-bun muffin tin with paper wrappers, and add a teaspoon of each colour to each liner in reverse rainbow order. That's purple, blue, green, yellow, orange and red. (Clarity is important in recipes, after all.)
  4. Bake for about 20 minutes at 180°C, until a tooth pick inserted into the centre of one of the cakes comes out clean.
  5. Cool on a rack. DO NOT COOL IN THE TIN unless you want soggy cupcakes.
  6. Make the icing: mix the softened butter with the cream cheese, then add the sugar. You might not need it all - stop at the consistency you like. I like it thick and shiny, so add it all.
  7. Use the icing to frost the cakes - a palate knife makes pretty swirls. Finish with hundreds and thousands, and remember: less is more. You want the cupcakes to look sweet and innocent, so that the rainbow is a surprise.
Don't forget to Re-Invent the Lamington! Deadline 26 January.

Tuesday, 29 December 2009

Pumpkin Whoopie Pies

I the fabric in the background.

Or, 'The Return of the Martha Metricator'.

I don't know about you, but I think both titles have their charms.

This is another recipe that I have been meaning to write about for ages. Truth be told, the reason I haven't done so is that I don't like the photo I took of them, but after the Mushroom Cookies, it seemed like a natural thing to do. Sharing the American recipe love with the rest of the world, I mean.

Whoopie Pies aren't popular at all in the UK. They should be though; they're basically cake sandwiches at the end of the day. And if a cake sandwich cannot be popular in the country that brought you the sandwich in the first place (thank you, John Montagu!), there is something terribly wrong.

I saw Martha make these on television when I was in New York once (I was towelling my hair not really paying attention, and at that point didn't even know who Martha was, but there's only so many times you can hear somebody repeating the word 'whoopie' in an odd voice before you sit up and take notice), and immediately decided to make them for Halloween the following year. Which was this year and also my friend Bridie's birthday - she had the cake stand. More than enough cause for a baking session, I'm sure you'll agree. I don't suggest you wait for such a reason though. Just get in the kitchen and get going right now!

Incidentally, Lynda, who I know reads this (Hi Lynda!), told me when we were staying at her place in Melbourne, that in her neck of the American woods (so to speak... She's not an Aussie), they call these cakes 'Moon Pies'. I think that's a much better name! So that's what I am going to call them from now on.

I halved the recipe by the way. You don't need to feed an army.

Pumpkin Moon Pies

You will need:

200g plain flour
1/2 tsp salt
1/2 tsp baking powder
1/2 tsp bicarbonate of soda
1 tbsp cinnamon
1 tsp cloves
1 tsp ginger
200g dark muscovado sugar
125ml vegetable oil
400g pumpkin purée (one can - you could just steam and mash a butternut squash, and then weigh 400g of it)
1 egg
1 tsp vanilla extract

200g cream cheese
100g icing sugar
2 tsp vanilla extract
  1. Sift the dry ingredients together. Pre-heat the oven to 180°C. Line a baking sheet.
  2. In a large bowl, mix the oil and sugar, using a wooden spoon.
  3. Then add the eggs, vanilla and pumpkin, and stir until smooth.
  4. Fold in the flour mixture.
  5. Using an ice-cream scoop, place dollops of mixture onto the prepared baking sheet, well spaced apart.
  6. Bake for about 12 minutes or so, until a tooth pick inserted into the centre of the cakes comes out clean.
  7. Cool on a wire rack.
  8. When cool, sandwich the cakes together, flat sides facing, with cream cheese frosting, which you make by mixing all of the ingredients together in a bowl until smooth.
  9. Eat! They make great sharing food. But I won't judge you for having a whole one to yourself.

Tuesday, 27 October 2009

Chocolate-Peppermint Cookies and Cream Cupcakes

Another birthday, another excuse to go wild in the kitchen. There's another one coming next weekend too, so I'm in my element at the moment. I wish I could do birthday cakes every week!

This time it was a thirtieth, so there was an excuse to get the champagne out as well. I have never actually eaten cupcakes with champagne, and there was a little bit of me that wanted to exploit the connection and make a champagne cocktail flavoured cupcake. But when I saw what Mr. Other P had chosen to give Kate (whose birthday it was), that idea went out the window, though you never know when it might return.

He'd been into town and bought a big selection of American junk food from the food hall in House of Fraser. I love looking at all that stuff! There was some Hershey's fudge topping for ice-cream, a bag of Reese's Pieces (nearly snaffled those for myself), a box of Aunt Jemima pancake mix, some raspberry twizzlers, and a whole host of other things with exactly the right kind of gleaming, colourful packaging that makes junk food so attractive.

But something was missing. It took a while to figure out what it was, but I got there. Oreo cookies. Aren't they supposed to be America's #1? I might be making that up, but I'm sure I heard that somewhere. Probably written on the packet...

Anyway, there were a couple of reasons why there were no Oreos. The most obvious was the price of the damn things. Nobody's going to pay £7.00 for them, whether they are America's #1 or not. House of Fraser would do well to remember that. I mean, come on... Seven quid for biscuits?!

The second reason was that Mr. Other P doesn't like them. He thinks they're dry and tasteless, despite looking like they are going to be chocolaty and delicious. If pressed, I would agree with him, but I do still like them because they are always the biscuits you find in cookies and cream ice-cream. Which most people would agree is very, very delicious indeed.

So, since there were no Oreos in the birthday hamper, I decided to make Oreo cookies and cream cupcakes. And because I've had a bottle of peppermint extract knocking around on the shelf for a while, I decided to use that too. I don't think it's an obvious pairing, but it fits in with my new 'why hold back?' approach to flavours (as evidenced by this post), and more importantly, it works. It may sound immodest, but seriously, these are incredible. And yes - other people said so.

I should add, I didn't buy the £7.00 American Oreos. I got the 'Made in the EU' version that come in different packaging but taste the same. A bargain at 89p from the corner shop!

If you don't want to make the cupcakes themselves chocolate flavour, then don't. It's all about the frosting with this one.

Chocolate-Peppermint Cookies and Cream Cupcakes

You will need:

125g plain flour
125g butter, softened
125g caster sugar
2 eggs
30g cocoa powder
1 tsp baking powder
1/2 tsp bicarb. of soda

30g butter, softened
100g full fat cream cheese
250g icing sugar, sifted
1/2 tsp peppermint extract
1 packet Oreo cookies

  1. Line a 12 bun cupcake tin with paper liners, and pre-heat the oven to 180°C.
  2. Use my usual, lazy method to make the cake batter. Dump everything in a bowl and mix, adding a splosh of milk if necessary, using electric beaters, until creamy and combined. Use an ice-cream scoop to transfer the batter to the prepared tin.
  3. Bake for 20 minutes, and then turn the cupcakes out onto a wire rack to cool. If they've risen a lot (mine did), level the tops with a sharp knife, so they look pretty when you ice them.
  4. Make the frosting: Cream the butter and cream cheese, then slowly stir in the icing sugar. You might need a little less or a little more to get the consistency you want - don't be afraid to adjust quantities. Add the extract, and taste. You might need more if yours isn't as strong as mine. Crush 5 Oreos and mix in until nicely combined. You will be amazed at the beauty of what you have created!
  5. Frost the cupcakes, smoothing the frosting out evenly. It looks very pretty swirled, but you could pipe it if you prefer.
  6. Chop remaining biscuits in half, and use to top the cupcakes. Sprinkle with green edible glitter.
  7. Devour!

Thursday, 22 October 2009

Birthday Cake De Lux


I can never resist a cake, and a birthday cake is even better. The thing is, you'd never make an outrageously over-the-top cake in the daily run of things, but when it's a birthday you get free license to really go to town.

Quite often, that means decorating for me. For example, last year I recreated the Welsh flag in cake form for Mr. Other P's thirtieth, complete with a glittering red edible dragon. Yes, really. Even though neither of us are true bloods. He just likes flags. And maps. And I like messing about with sugar, so it was a nice project.

Anyway, when I was in New York with my Mum and sister this February, I had my first contact with what I like to think of as 'The American Baking Scene' (doesn't that sound grand?). I say my first contact - I'd been to Magnolia with Mr. Other P the first time I was there, but that didn't really impress me (the cakes were dry. All that fuss for dry cake!). But did you know that there's a place in Brooklyn where they make carrot cake cheese cake? It's not flavoured cheesecake - it's cheesecake with carrot cake as the base. And it has frosting! Is that not amazing? I think it's one of the most creative and unique ideas I've ever seen. It blew me away. When I got back, I googled the place (it's called Junior's), and it turns out that they've been making this amazing stuff since before I was born, so why it was kept a secret from me until the age of 26 I do not know. They deliver, if anyone's feeling hungry.

The point is, the Americans get creative with flavour, whereas sugar craft is often boring when you bite into it. So, given that a birthday cake is a reason for excess anyway, I decided to go about this the American way. And I'm glad I did, because this one's a keeper.

I started with Mr. Other P's favourite flavour combination, chocolate and cherry (born after having eaten these). Well, chocolate was easy: I made a regular chocolate cake mixture and thought about what else to add. Without too much ado, a large bar of Belgian chocolate was smashed up and stirred in, along with a whole bag of crushed almonds and half a pot of sour cream (well, why not?).

I then layered in some tinned cherries. I planned to use a glass jar of those fancy-pants morello cherries you can buy from the deli in town, but when I saw how much they cost I realised we'd have to remortgage if I did. It's fine; the tinned ones tasted nice enough to me.

Now, ordinarily I'd stop there. But birthday cakes need icing. It's a rule. I thought about making a pink glaze from the juice the cherries came in, but since Mr. Other P ran the Cardiff half marathon in less than 2 hours at the weekend (that's his medal in the photo!), I figured that it was acceptable to make a chocolate fudge frosting instead. I don't know if I can really call it that though, as I just made it up, using what ingredients I had left. The texture is quite soft - it's smoothes out much easier than buttercream icing, and I think you could get it perfectly smooth quite easily. I just like it looking rugged and swirly.

And so there we have it. Double Chocolate Cherry-Nut Fudge Cake! A step up from just chocolate, methinks. Do not think about the calories and fat involved. It's a birthday cake!


Double Chocolate Cherry-Nut Fudge Cake

You will need:

250g plain flour
250g soft butter
125g granulated sugar
125g dark muscovado sugar
4 eggs
2 tbsp cocoa powder
2tsp baking powder
1tsp bicarb. of soda
150ml sour cream
200g good quality dark chocolate
200g ground almonds
1 tin of cherries in natural juice, drained

225g butter
300g good quality dark chocolate
1tbsp golden syrup
100g icing sugar, sifted
150ml sour cream


  1. First make the cake. Put the first 8 ingredients into a (LARGE!) bowl, and beat together using a hand whisk until nicely combined.
  2. Stir though the sour cream, then add the almonds and roughly chopped chocolate.
  3. Grease and line the bottom of a 23cm round cake tin, and add half of the mixture. Smooth out, then cover with as many cherries as you like (I used half the tin... Because I'd eaten the rest.). Top with the remaining mixture, smooth out and bake in a 180°C oven for an hour, or until done.
  4. Cool on a wire rack.
  5. Make the frosting. Melt the chocolate and butter together, and add the syrup. Stir. Chill for 2o minutes. Then add the sour cream, and icing sugar, and beat until thick and creamy. Use to frost the cake.
  6. Add sprinkles and candles.
Related Posts with Thumbnails